REVIEW · WANAKA
Wanaka: 4-Hour Intermediate Waterfall Cable Climb
Book on GetYourGuide →Operated by Wildwire Wanaka · Bookable on GetYourGuide
Wanaka’s waterfall cable climb turns a normal day out into a real challenge. This guided intermediate via ferrata-style adventure takes you up the world’s highest waterfall climb, mixing rock-climbing tools with suspension bridges and big mountain views.
I especially love how it’s structured for beginners-to-intermediate confidence: you start with a practice section, then move into an intimate group climb (no more than 5 people per guide). I also love the payoff. Lunch sits right by a huge 60m waterfall, with a chance to swim or just recover while you take in the farmland and lake views. The main drawback is exposure: if you know you struggle with heights or you can’t stay calm while you’re clipped into the system, this may feel like too much.
In This Review
- Key things to know before you go
- Entering the World’s Highest Waterfall Climb (Without Being a Daredevil)
- Getting to Twin Falls: the meeting gate where the day starts
- Safety briefing and gear up: helmets, harness, and a clear plan
- Training at the base: the practice climb that earns your confidence
- The intermediate climb: 320m up with blue pools, rungs, and bridges
- What the route feels like
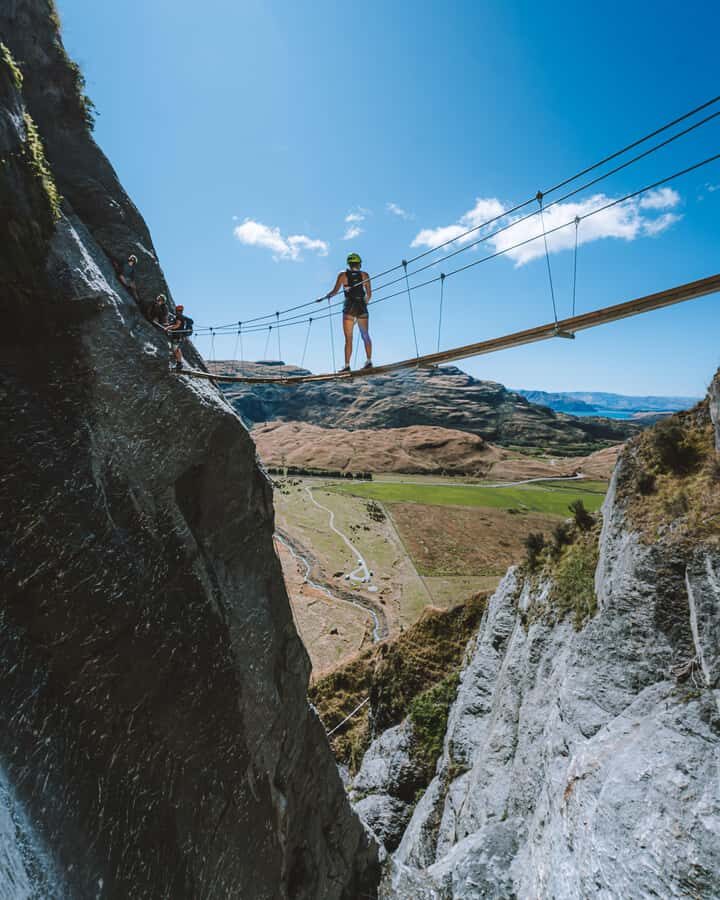
- Suspension bridges and photo stops
- Views during the climb
- Reaching the summit: lunch at the base of the 60m waterfall
- The 45-minute descent: controlled, not rushed
- Guides make the difference: small-group coaching and real reassurance
- What you get for $224: value beyond the adrenaline
- What to bring (and what to skip) for a smoother climb
- Who this intermediate waterfall cable climb is for (and who should pass)
- Should you book Wildwire Wanaka’s intermediate cable climb?
Key things to know before you go
- 320m vertical climb on an intermediate route using cables, rungs, pegs, bridges, and ladders.
- Small groups (up to 5 per guide) means more coaching and safer pacing.
- Expect blue pools, cliff scaling, and suspension bridges that put you face-to-face with the waterfall.
- A built-in training climb at the base helps you learn the movements before committing to the full route.
- Lunch is included at the top, right by the 60m waterfall, with mountain and farmland views.
Entering the World’s Highest Waterfall Climb (Without Being a Daredevil)
If you want an active day in Wanaka that feels different from a hike, this is it. You’re climbing a waterfall corridor using fixed steel elements and a safety system. That means it’s not about being an elite rock climber. It’s about following the route, staying connected to the safety line, and letting your guide coach you through technique and nerves.
What makes it so interesting is the combination of “vertical progress” and “scenic payoffs.” You’ll move up for long stretches, then stop at built-in points with dramatic water views. The climb is also varied: cable sections, iron rungs, ladder moments, and bridge crossings. In other words, you don’t spend the entire day doing one monotonous thing.
I’d also call it a mental workout. The physical part is real (you’re on a cliff face for a while), but the exposure is what changes your breathing. One reviewer advice stuck with me: if heights throw you into panic, the route asks you to stay steady the whole time you’re hooked into the climbing system. That’s not a flaw in the activity. It’s just the deal.
Other Wanaka tours we've reviewed in Wanaka

Getting to Twin Falls: the meeting gate where the day starts
Your day begins at Twin Falls Waterfall. From Wanaka town, drive west on the Wanaka–Mt Aspiring Road along the lake. Head toward Treble Cone Ski Field and Mt. Aspiring National Park. After about 20 minutes, you’ll reach a cattle stop. Pull into the immediate left pull-out in front of two waterfalls.
Here’s the key detail that will save you time: you’re looking for a locked farm gate with the provider’s sign on it, and you meet directly at that gate area in front of the waterfalls. If you see the ski field road or gravel road ahead, you’ve gone too far.
This matters because you can’t show up “nearby” and expect to find the right start point quickly. The climb itself is organized and timed, so being in the correct meeting spot keeps the whole group on schedule.
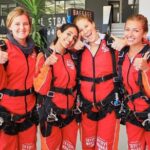
Safety briefing and gear up: helmets, harness, and a clear plan
Once you arrive, you get a safety briefing before anything starts. Then it’s helmet and harness time. You’re also going to get introduced to the way the route connects to the climbing system, and your guide will show you how to handle the tools and transitions you’ll face later.
The best part of this segment isn’t the gear itself. It’s the fact that the climb is run as a guided experience with continuous supervision. You’re not wandering into a canyon on your own. You’re learning on the go with a guide who’s watching your technique and reminding you how to move safely.
Also, you’re in an intimate group. Keeping groups small (up to 5 per guide) means you’re not stuck waiting around for people who are having trouble at the start. It also helps on the moments where you need coaching quickly.
Training at the base: the practice climb that earns your confidence
Before you climb the main route, you do a practice climb at the base of the waterfall. This is more than a warm-up. It’s where you learn the movements in a controlled way: getting used to iron rungs, understanding how your harness positioning feels, and practicing how you transition across the fixed sections.
If you’ve done via ferrata or similar systems before, you’ll pick up the rhythm faster. If you haven’t, the training matters even more. Several people in the feedback emphasized that they felt secure because the guides walked them through the steps and helped them take their time.
I like that the provider doesn’t throw you onto the hard bits immediately. You earn the ability to move without thinking about every single decision. That’s how you avoid the “freeze” feeling when you’re already high on a cliff.
One practical tip: wear the right footwear early. Comfortable shoes help you get through the training section and also matter once you start crossing slick or wet surfaces near pools.
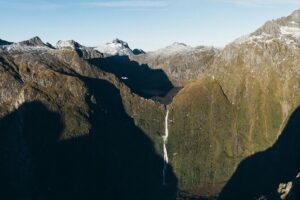
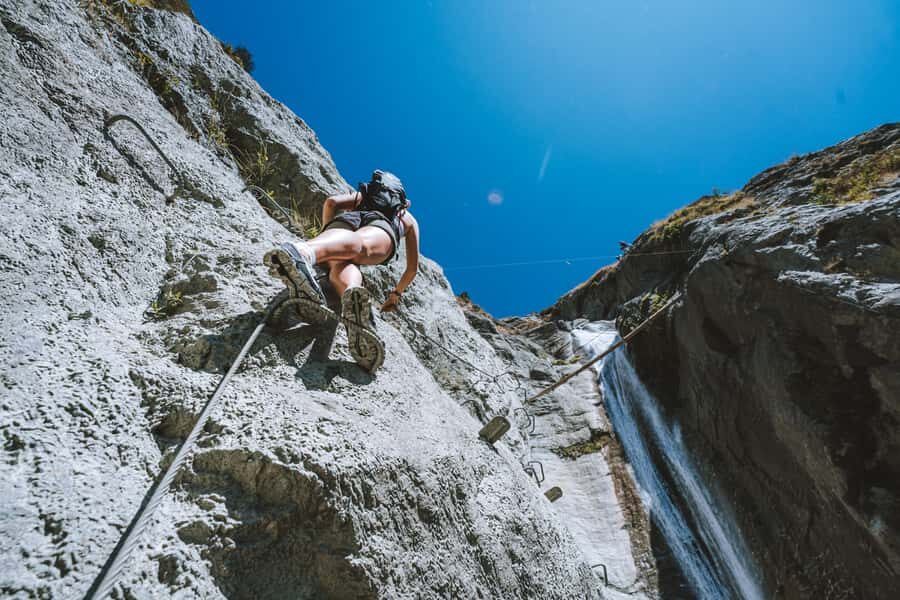
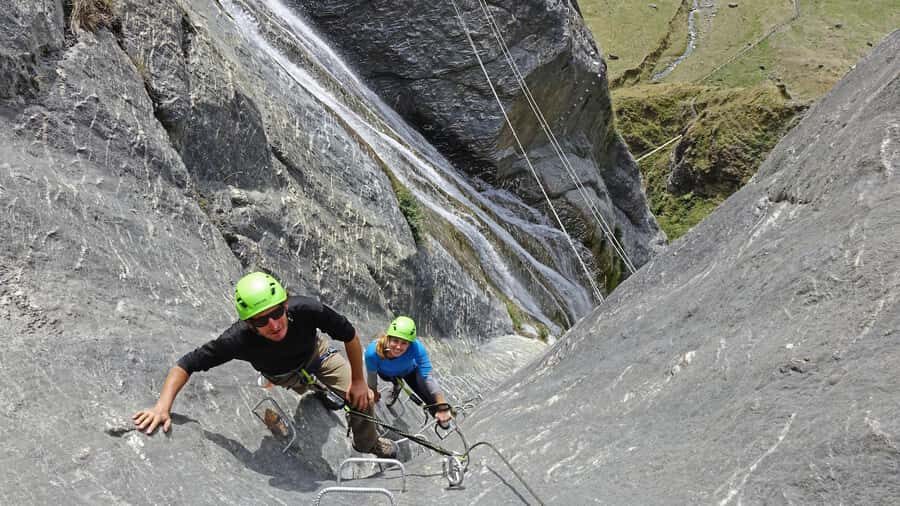
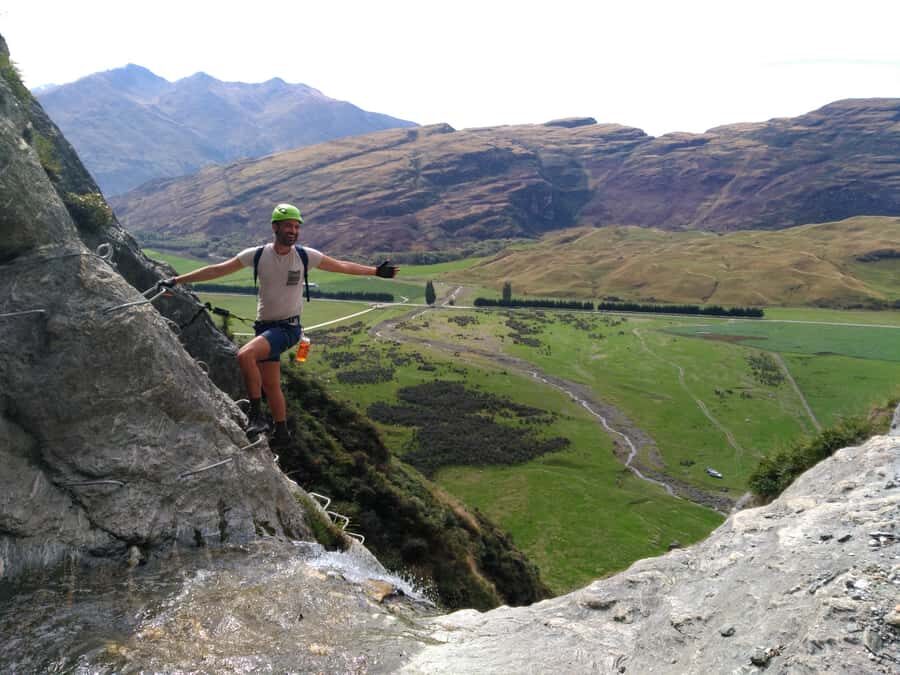
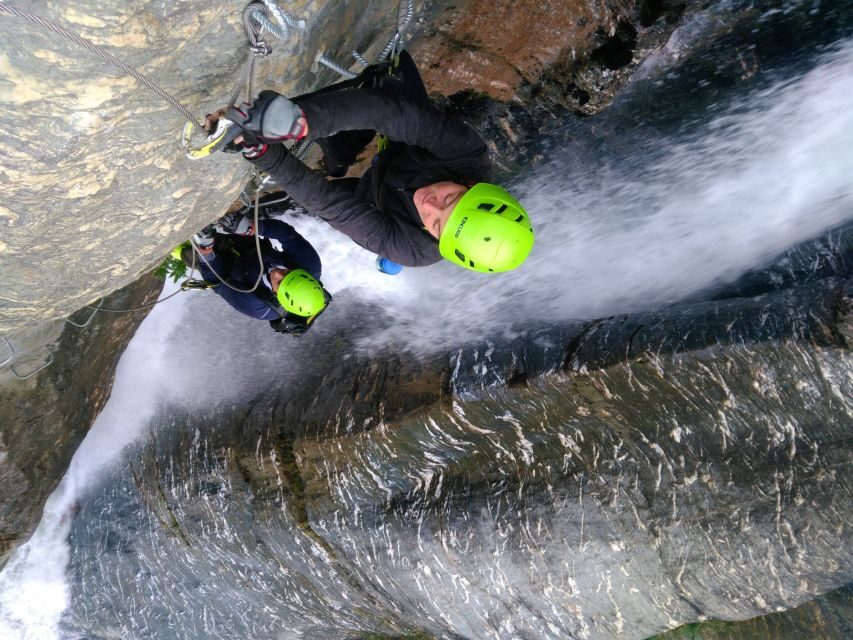
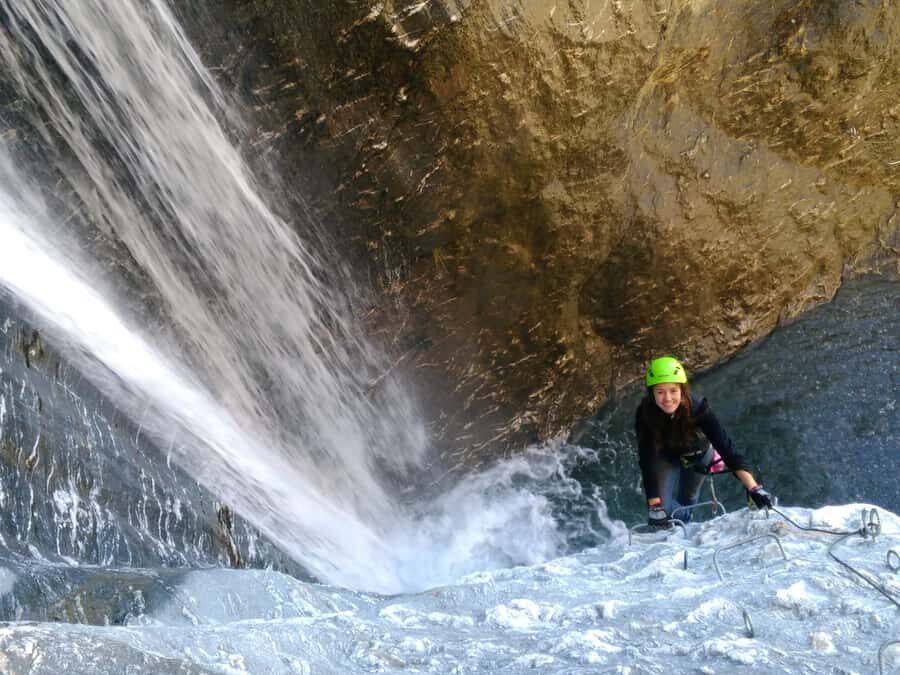
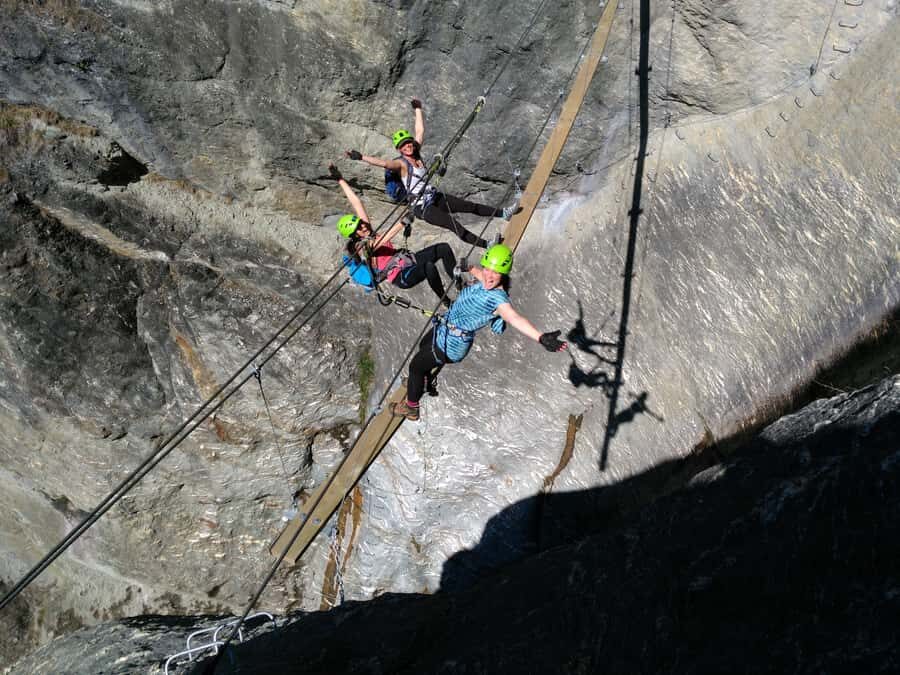
The intermediate climb: 320m up with blue pools, rungs, and bridges
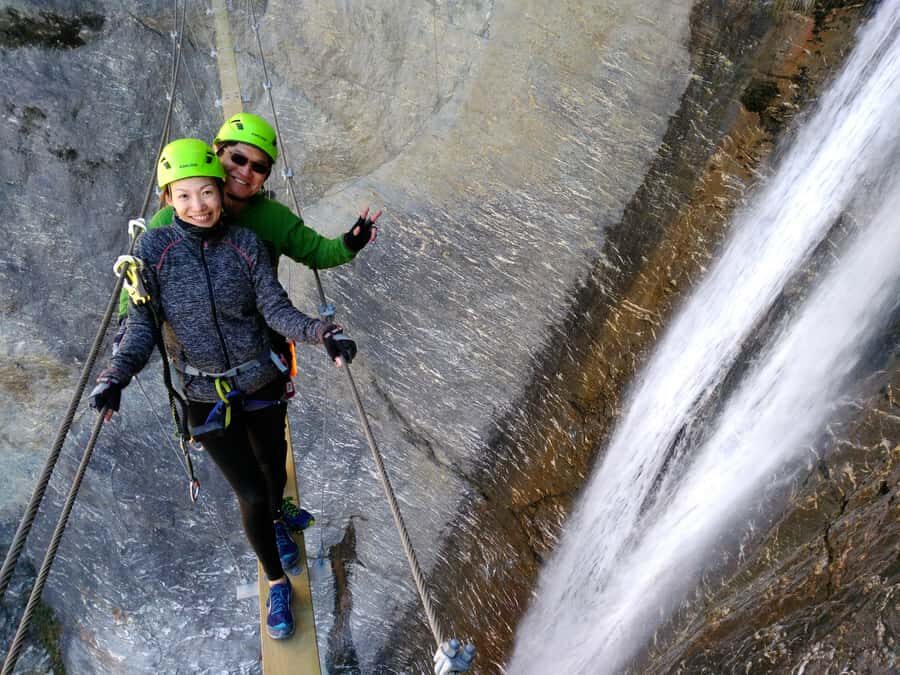
Now comes the main event. The intermediate route climbs 320 meters of vertical cliffs. You’ll work your way upward while crossing blue pools and moving through sections that include suspension bridges and scaling challenges.

What the route feels like
The best way I can describe it is “steady effort with frequent moments of big views.” Your pace is guided and safe, but you’re still doing real climbing. You’ll use a mix of:
- cable sections
- iron rungs
- pegs and fixed points
- ladders
- suspension bridges
Each element changes how your body works. Rungs ask for careful foot placement. Cables and pegs ask for controlled hand placement. Suspension bridges add a different kind of challenge because your balance has to stay calm while the waterfall roars nearby.
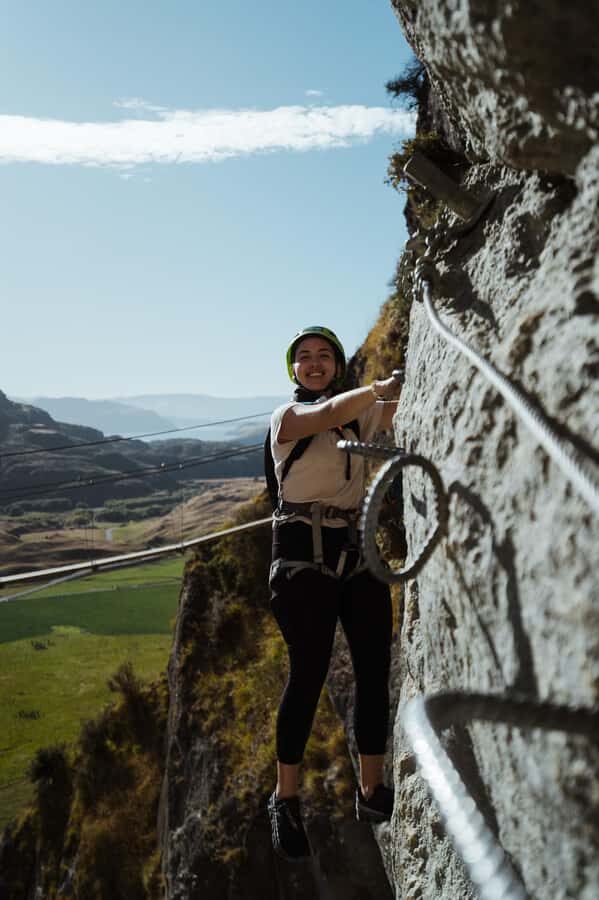
Suspension bridges and photo stops
One of the highlights is crossing bridges, including a stop next to a huge cascading waterfall for photos. This is where the “adrenaline” part shows up, but in a way that still feels guided and safe.
If you’re the type who worries about heights, treat the bridge crossings like a skill you practice, not a test you survive. Keep your focus on the connection points and your next step. One person’s advice in particular made sense: you’re responsible for your own connection while you’re climbing, so your best outcome comes from calm, repeatable movement.
Views during the climb
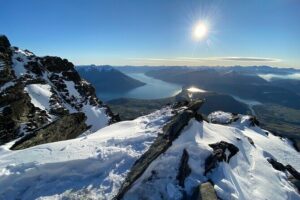
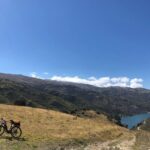
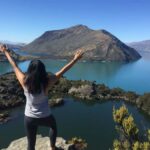
Even while you’re focused on the climbing, the scenery is hard to ignore. You get glimpses of the surrounding farmland, mountains, and lakes around Wanaka. That means the climb doesn’t feel like you’re staring at rock the entire time. It’s active with rewards.
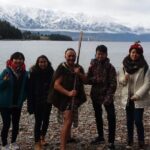
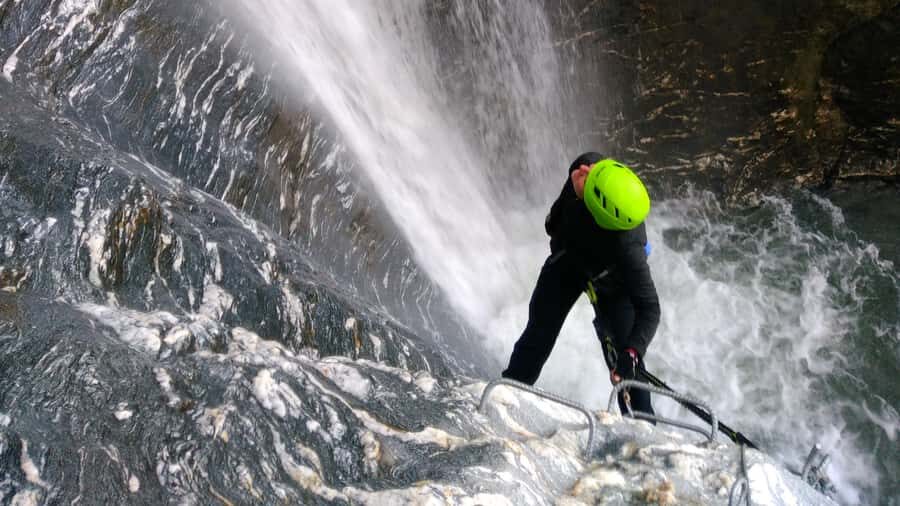
Reaching the summit: lunch at the base of the 60m waterfall
After you finish the upward route, you reach the summit area and get a recovery moment. Lunch is included at the base of the 60m waterfall.
This part is important. When you climb for hours, what you need most isn’t another challenge. It’s a chance to reset: sit down, eat something, and let your arms and legs stop feeling like they belong to someone else.
You also get options once you’re finished with lunch. You can enjoy views across the region, and you may even get a quick swim depending on conditions. Swimwear is on your list for a reason.
If you’re traveling with someone who’s excited about the “story” of the day, the summit lunch is when you’ll understand why people rate this so highly. You climbed past rungs and bridges, and now the waterfall is right there with you at eye level. It turns the whole experience from effort into memory.
The 45-minute descent: controlled, not rushed
After lunch, you start the descent down to the starting point. The walk down takes about 45 minutes, and it’s still part of the day’s workload.
The descent is where you can lose attention if you feel over-confident. I’d treat it like part two of the same lesson: stay steady, keep your footing in mind, and follow the guide’s pacing. You’ll already know the safety vibe from earlier, so this is mostly about finishing well.
The guides also help here with practical timing. With small groups, it’s easier to keep everyone moving at a comfortable speed.
Guides make the difference: small-group coaching and real reassurance
A lot of what makes this climb feel doable comes down to the guides. Names that came up include Ollie, Tongi, Blair, Sarah, Ryan, Dolce, Connor, Brandon, and Nolan. Across the feedback, the common thread was encouraging, patient instruction and a strong focus on safety.
That matters because your mind can play tricks on you on exposed sections. When your guide talks you through what you’re about to do and reminds you how to connect and move, you stop fighting the route and start working with it.
I also like that the guides help people who are new to climbing systems. Several feedback notes pointed out that participants didn’t need prior experience and that training plus guidance made the route feel manageable.
One more helpful mindset: think of it as a guided climb, not a solo stunt. If you remember that during the hardest moments, you’ll likely enjoy the experience more.
What you get for $224: value beyond the adrenaline
At $224 per person for about 4 hours, you’re paying for more than access to a waterfall structure. You’re paying for:
- expert guide coaching
- climbing safety equipment and a briefing
- introductory training at the base
- lunch at the top
In Wanaka terms, this price sits in the “serious experience” category. And honestly, it’s easier to justify when you compare what’s included. Many active tours charge similarly but don’t include safety gear, staff instruction, and food.
If you do it when you’re already comfortable with outdoor days, you’ll likely feel like you got a lot out of it because you’re getting both views and a real physical challenge. If you’re hoping for a casual stroll and photos only, it may feel overpriced because the day demands effort and attention.
My practical take: this is good value if you want an active, structured, unforgettable climb with lunch handled for you.
What to bring (and what to skip) for a smoother climb
Here’s a list built from what the experience asks for, plus the smartest habits that came up in feedback.
Bring:
- Swimwear (because the top includes a chance to cool off)
- Comfortable shoes and possibly hiking shoes with good grip
- Weather-appropriate clothing and outdoor layers
- A camera if you want photos, but camera use is at your own risk
- If you use a GoPro, attach it to your person (this is recommended)
I’d also bring a water bottle even though one isn’t included. Several people recommended having water, and after climbing and swimming potential, you’ll thank yourself.
Storage is available at the base of the waterfall for items you don’t need while you climb. So don’t stress about carrying everything onto the route.
Who this intermediate waterfall cable climb is for (and who should pass)
This is recommended for people with moderate fitness because it blends hiking, rock climbing, and walking. You also need full body mobility, and you must meet the weight requirement: 40 kg (88 lbs) minimum.
Not suitable if:
- you’re under 10 years old
- you’re pregnant
- you weigh under 40 kg (88 lbs)
One more “real world” filter: if you know heights trigger panic and you can’t regulate your fear, this climb may not feel right. You’re exposed and you stay connected to the system the entire time, which means your mindset matters as much as your leg strength.
On the flip side, this can work well for adults of different ages, including people who are not young athletes, as long as they meet mobility and comfort requirements.
Should you book Wildwire Wanaka’s intermediate cable climb?
I think you should book this if you want a Wanaka experience that’s active, guided, and built for a small group. The climb’s structure makes it more approachable than many assume: practice first, then a 320m intermediate route with bridges and waterfall views, capped by lunch by a 60m waterfall.
You should hesitate or choose another type of activity if you’re set on a relaxed day, or if heights make you panic. That’s not a safety issue on the provider’s side. It’s a fit issue. The climb asks you to stay calm while you move and stay connected.
If you’re in the right headspace and you can meet the mobility and weight needs, this is the kind of day you’ll remember for a long time.